Allen’s Tale

Allen’s Tale

My wife and I were out shopping when we came across a designer kitchen showroom. We were not in the market for a new kitchen but it is always nice to dream so we went in.

It was an Aladdin’s cave of state of the art kitchen technology and innovation.  A gentleman came over and asked if he could assist us.  We said we were only looking and dreaming, which he was fine with but went on to show us more.  He was the owner and passionate about kitchens.  He led us to his office and proceeded to show us a selection of virtual kitchens on his pc and explained how he could create a virtual design for us.  At this point he asked me what I did for a living and I told him I was a dental technician.  He instantly forgot about kitchens and started to explain how his teeth were the bane of his life.    He was in constant pain, could not eat or speak properly and then he uttered the words “I would give anything to sort out my teeth”.

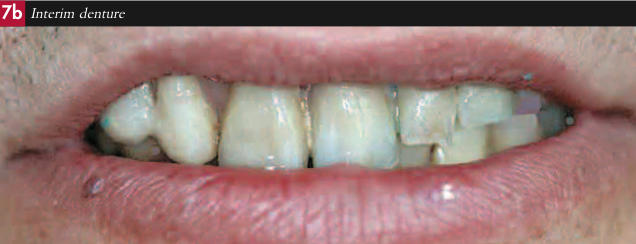
I could see as we talked that he had a remaining lower right canine and upper left canine, both of which were over erupted and mobile (Fig 1a).  He also had a set of poor fitting unaesthetic dentures (Fig 1b).  I felt sure I could help him and told him so. His response was that if I could sort out his teeth he would build us the kitchen of our dreams in gratitude

Initial Treatment

I referred him to one of my clients and so our tale begins. After an initial examination it was agreed that the two remaining teeth needed to be extracted.. It was decided in the first instance to fabricate a set of F/F immediate dentures, extract the remaining two teeth in order to provide a more aesthetic, better fitting, functional dentition.

Impressions were taken without the dentures from which study casts were fabricated and mounted on a semi adjustable articulator using his existing dentures as a jaw registration. Shade and tooth mould were also selected. Impressions were taken of the existing dentures as a guide (Fig 2)

The anterior teeth were set up for a try in. Adjustments to the position of the teeth were carried out intraorally around the remaining canines. The mid line, smile line, incisal plane and lip support were all checked (Figs 3a-c). Once we were happy with the aesthetics the canines were removed from the casts, the rest of the teeth set up and immediate F/F dentures fabricated.

The remaining teeth were extracted and the dentures fitted (Fig 4). Whilst the tissues were healing and Allen was getting used to the dentures clear radiopaqued copy dentures were made (Fig 5). At the next visit the radiopaque dentures were used in conjunction with a CT scan to assess the relationship of the residual bone to the established tooth position on the dentures.

Sufficient residual bone in the mandible ensured that enough implants could be placed for fixed bridgework. Unfortunately there was insufficient bone in the maxilla and without the willingness to have sinus grafts it was decided to restore with a milled bar and integral attachments on four implants in combination with a removable prosthesis.

Implant Placement

Using the information from the CT scans, holes were drilled into the clear copy dentures in what were considered to be the best positions for fixture placement and these were subsequently used as implant placement guides (Figs6a-b).

Eight implants were placed in the mandible and four in the maxilla. The dentures were selectively relieved to accommodate the healing caps on the fixtures. The dentures then continued to be worn throughout the healing and integration period.

After six months the implants were uncovered and pick up impressions were taken (Figs 7a-b). Analogues of the fixtures were screwed onto the impression copings. Pliers were used to hold the analogues in order to prevent movement of the impression coping within the impression whilst tightening the screws (Fig 8). Once all the analogues had been secured (Figs 9a-b), a wax spacer was applied around the junctions of the impression copings and the analogues (Fig 10) to ensure subsequent ease of removal of the impression from the cast and good access to the heads of the analogues once the cast had been poured. Once the fixture head working casts had been fabricated (Figs 11a-b), the copy dentures were used as a jaw registration (Fig12) in order to mount the casts on a semi adjustable articulator (Denar Mk II) (Fig 13).

Definitive restorations

Indices were made from the dentures to establish the tooth position on the casts.

Upper Arch

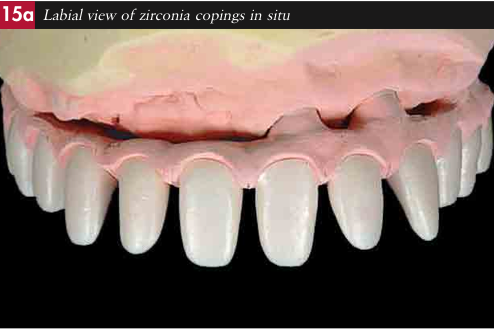
The upper working cast and index were sent to NobelBiocare who manufactured a titanium beam with integral locator attachments (Fig14). A Cr/Co denture framework was then constructed over the beam with housings for the locator attachments (Figs15a-c).

Lower Arch

Non- engaging abutments (NobelBiocare-Conical Connect) were screwed to the lower working cast. A framework was fabricated around them with a pattern resin (GC) using the index of the tooth position as a guide (Figs 16a-d). The pattern was sprued and fixed to a crucible former for investing (Figs 17a-b). The framework was cast in a silver palladium alloy (Palliag M-Degudent). It was devested, trimmed and screwed to the working cast. The screw holes were then sealed with silicone putty to prevent resin locking in the screws when processing (Fig18).

A new set of denture teeth (Premium-Heraeus Kulzer) were then set up to the Co/Cr framework on the upper and the metal framework on the lower using the index as a guide.

The tooth set up between the upper and lower arches were then adjusted and refined on the articulator and finally the soft tissues were waxed up to completion (Figs 19a-c).

Processing

The upper denture was removed from the model, invested and processed using the flask and packing technique.

A silicone putty mould was made over the lower set up and used to process the arch. The putty mould was removed and access and exit holes made at each end for pouring the acrylic resin. The teeth were removed and all residual wax cleaned off with boiling water. The teeth areas to be set in the acrylic were then sandblasted with 90 micron aluminium oxide to ensure a good bond. The teeth were then seated back in the mould and where necessary, if the teeth were loose they were secured with a tiny drop of Cyanoacrylate. The mould was painted with a separator (Unifol) and the metal framework was treated with a bonding agent (Metafast). The mould was then seated back on the working cast and sealed around its periphery with further putty. Autopolymerising acrylic resin (Palapress-Heraeus Kulzer) was poured into the mould and cured in a pressure pot of water at 55 degree centigrade at 2 bar pressure for 10 minutes (Fig 20). On removal from the pressure pot the mould was cooled down under cold running water. The excess acrylic was removed with a tungsten carbide burr and the putty seal and mould carefully peeled off.

The processed upper denture and lower bridge in situ on their respective working casts were placed back on the articulator and the bite adjusted using red marking tape (12 micron) (Figs 21a-d).

The upper denture was finally trimmed and polished and the locator retention caps inserted (Figs 22a-f).

The acrylic over the screw holes in the lower bridge were carefully drilled out to expose the silicone putty which was then removed to access the screws. The structure was then removed from the model trimmed and finally polished.

Fitting

The upper healing caps were removed and the abutments screwed in and torque tightened (Figs23a-c). The titanium beam was then screwed to the abutments and torque tightened (Figs 24a-b). The upper denture was then seated over the beam. The lower bridge was screwed into place and tightened to 25Ncm (Figs25a-b).

The holes were then partially filled with ptfe tape (Figs26a-c) to ensure ease of access to the screws, if necessary, at a future date and then covered with tooth coloured resin (Figs 27a-b), before finally being adjusted and polished (Fig 28).

Epilogue

I lived up to my side of the bargain. Allen is now dentally fit, pain free, comfortable, stable and able to eat anything. He is delighted with the aesthetics of his new smile and only wished he had found me years earlier.

As for our kitchen……… (Fig 31).

My sincere thanks to Dr Zaki Kanaan, Dr Omid Sobhani and John Davies for their assistance in the management and treatment of Allen’s reconstruction.

Peter’s Tale

Peter’s Tale

Implant retained prostheses - an economical and functional solution

Peter is a social worker who had a serious social problem – rampant oral disease! He presented as an emergency in considerable discomfort with puss oozing out from around his infected teeth.

A course of antibiotics and several hygiene sessions cleared the infection but the teeth were beyond salvaging (Figs 1a-e).

Bone loss (Fig 2a) and financial constraints dictated the subsequent treatment options. After careful consideration and discussions with Peter, it was agreed that the remaining teeth would be extracted and immediate dentures fitted, with the option of fixture placement after a period of healing. CT scanning (Figs 2b-d) showed insufficient bone in the maxilla for implant support; therefore sinus grafts became a further agreed option.

Initial Preparation

Once the infection had cleared, alginate impressions were taken together with a face bow and jaw registration. Two sets of study casts were fabricated and mounted on a semi adjustable articulator (Denar MkII) (Fig 3a-c). One set was kept for reference.

The second set of study casts was mounted using a 1.5mm spacer of wax between the mounting plates and the articulator. This was done to open the vertical dimension uniformly. By removing the wax and fully seating the mounting plates once the casts had been mounted and tidied, the vertical dimension was increased by 3mm (Figs 4a-e).

Immediate dentures

The remaining teeth were cut off the second set of casts and a set of selected stock teeth were set up to the edentulous arches and processed (Fig 5a-h), to provide full upper and lower immediate dentures (Fig 6).

Treatment

Stage I
The remaining teeth were extracted and the immediate dentures fitted with a soft conditioning liner to assist healing (Fig 7).

Stage II
After a period of healing two implants (Straumann) were placed in the canine region of Peter’s mandibular arch. Healing caps were placed and the implants left to integrate. The denture was modified and relined to accommodate healing.

After three months the implants were uncovered. Ball attachments (Ball Anchor – Straumann) were screwed to the head of the fixtures (Fig 8) and the existing denture modified to accommodate the female component of the attachments.

The female retaining caps were placed on the ball attachments (Fig 9). The denture was tried in to check that it was seating passively. Minor adjustments were made to ensure that the denture did not catch on the attachments. Undercut spaces below the retaining caps were blocked out with soft wax to prevent the denture locking onto the attachments.

With the denture maximally seated and held in place under hand pressure, the female caps were attached by beading on tooth coloured autopolymerising resin (Duralay-Reliance Inc), (Figs10a-b).

Once the resin had set, the denture was removed and then reseated to confirm that the caps were engaging.
Out of the mouth, pink autopolymerising resin was added to the denture and polished to ensure the attachments were fully secured and the internal and external contour of the denture was regained and smooth.

Seating was once again checked and the denture finally polished. The mandibular denture was now secure and stable but could also be removed for cleaning.

Stage III
Once finances permitted, sinus grafts were carried out and four implants (Straumann) were placed in the maxillary arch (Fig. 10c). Peter was very accommodating and went without his denture during the initial healing period. During this period the denture was modified and relined to accommodate maturation of the bone and integration of the fixtures.

Stage IV
After six months the implants were uncovered and a fixture head impression taken. An alginate impression of the lower denture was also taken.

A working cast of the upper arch and study cast of the lower denture were fabricated. The upper denture was located on the working cast and used as a jaw registration to mount the casts (Fig. 11).

Appropriate abutments were selected using the abutment selection kit (Straumann), (Fig.12).

The selected abutments were screwed to the cast, ensuring they were parallel to each other (Fig. 13), and a locating jig fabricated (GC Resin), (Figs.14a-b).

Screw retained sleeves were waxed and cast to fit over the abutments using pre-formed plastic countersinks. The outer surfaces of the sleeves were roughened and undercut to assist retention to the denture (Fig. 15). The bulk of the pink plastic was removed from the original denture, keeping the buccal gum work and ensuring a passive space to accommodate the sleeves.

A silicone index (Lab Putty-Coltene) fabricated prior to modifying the denture was used to locate the residual arch of denture teeth to the working cast. The teeth were then waxed to the cast and around the screw retained sleeves (Fig. 16).

Locating lugs were cut into the working cast and a silicone mould fabricated over the waxed up teeth to the working cast.The mould was removed and entry and exit openings drilled. The wax was boiled off the teeth and cast.

The teeth were seated in the mould and the screw heads in the sleeves sealed over with wax to prevent acrylic entering the screw holes. Undercuts around the base of the abutments were also blocked out with wax (Fig. 17). Separator (Unifol) was applied to the cast (Figs. 18a-b) Monomer was painted onto the old acrylic to condition it, and a bonding agent (Metal Primer II-GC) applied to the metal sleeves (Figs. 18c-d).

Silicone putty was then used to seal the mould to the cast (Fig. 18e). A very runny mix of autopolymerising acrylic resin (Palapress-Heraeus Kulzer) was poured until it filled the mould and then cured under 2 bar pressure in water at 55 degrees centigrade for 15 minutes (Fig. 19a). The mould was removed (Figs. 19b-c) and the bite adjusted on the articulator. The processed teeth were unscrewed from the cast, trimmed and polished (Figs. 20a-b).

Fitting

The healing caps were removed and the abutments located using the jig, screwed into place and torque tightened to 25Ncm (Figs. 21a-d). The teeth were located over the abutments and the bite checked and adjusted using marking tape. Relief grooves were cut into the undersurface of the beam to accommodate the use of superfloss for cleaning (Figs. 22a-b).

The teeth were screwed into place and initially torqued tightened to 15Ncm (Figs. 23a-b) to allow everything to settle before finally tightening them a couple of days later. Although the upper teeth are fixed, the use of superfloss and a waterpic will maintain hygiene. The prosthesis can also be periodically unscrewed and removed for more vigorous cleaning by the hygienist.

Conclusion

After a lengthy course of treatment primarily dictated by financial constraints, Peter is at long last feeling much more sociable and is now a social worker with a big smile to go with his big heart!

Case done in collaboration with Dr Anna Eliot

Michelle’s Tale

Michelle’s Tale

Tooth discoloration: regaining aesthetic harmony

Michelle is a natural beauty with flowing red hair and a gorgeous face. As a child she was given medication containing tetracycline, resulting in severe discolouration of her adult teeth. When I first met her, through one of my clients, her maxillary teeth had previously been crowned in an attempt to mask the discolouration, but the restorations had subsequently failed and gingival recession had occurred.

The mandibular teeth remained untouched, thus no attempt had been made to mask the staining or correct the occlusal discrepancies apparent on both sides of the arch (Fig. 1a – f). Michelle was looking for oral health, good function and an aesthetic smile with harmony between her face and both the soft and hard oral tissues.

Planning

Alginate impressions, a facebow and jaw registration were taken. The impressions were poured twice and the resulting casts mounted on a semi-adjustable articulator (Denar Mk 2).

One set was kept as a record and a full contour wax up carried out on the second set (Figs. 2a – e). By evaluating the wax up, the appropriate restoration for each tooth was decided upon.

Treatment

The Failed crowns were removed, selective electro-surgery carried out on the gingiva and the teeth re-prepared as necessary. Minimal tooth reduction was carried out, but the margins were placed just below the gingival crevice to optimise the aesthetic outcome. Tooth 14 was prepared for a veneer and tooth 26 for an onlay (Figs. 3a – b). In the mandible, teeth 34, 36, 44 and 46 were prepared for onlays to correct the occlusal discrepancy.

Temporisation

Indices were made from the wax up (lab putty- Whaledent) and subsequently used to fabricate the interim temporary restorations at the chair side (Figs. 4a – e). The defect in the lower arch was corrected and temporisation allowed the aesthetics and function to be assessed. Shade selection for the definitive restorations was carried out in the laboratory under colour corrected light conditions (Fig. 5).

Definitive restorations

Following minor adjustments to the occlusion and time allowed for the tissues to heal and stabilise, the temporary restorations were removed, retraction cord placed to clearly expose the margins and the definitive impressions taken. Working casts were fabricated and mounted on a semi adjustable articulator (Denar Mk 2) using a facebow and intercuspal jaw registration (Fig. 6).

Fabrication of Crowns

Zirconia based crowns were chosen for their ability to mask underlying discolouration. A set of dies suitable for scanning were fabricated and trimmed to expose the margins. The Zirconia copings were designed and milled (inEos and inLab – Cerec). The Zirconia blocks are milled 25% larger. In their soft green state they are trimmed and then cleansed in a porcelain furnace at 700°C for 5 minutes before being sintered at 1530°C in a ZYrcomat furnace overnight during which they shrink to fit and harden. Finally they are fitted to the dies and the margins carefully trimmed before being regenerated in the porcelain furnace at 1000°C for 10 minutes. This process converts the structure from its monoclinic crystalline phase to its tetragonal crystalline phase, maximising its strength and resistance to crack propagation. After this process the copings should not be ground or abraded (Figs. 7a – e). The prepared copings were veneered with ceramic (VM9- Vita) (Figs. 8a & b).

Fabrication of the Veneer and Onlays

The veneer (tooth 14) and the onlays (teeth 26, 34, 36, 44 and 46) were waxed to full contour (Fig. 9a), sprued and invested in a ringless mould using a refractory investment (Matchpress – Schottlander) (Figs. 9b & c). The wax was burnt out of the mould in a furnace at 900°C for 1 hour 15 minutes. The units were then pressed from ceramic ingots (Herapress – Heraeus Kulzer) (Fig. 9d) in a pressing furnace (Mulitmat Touchpress – Dentsply) (Fig. 9e) at 1050°C under vacuum.

The pressed mould was left to bench cool before being carefully devested (Figs. 10a – c) using 50μ aluminium oxide to remove the bulk of the investment then 50μ glass bead so not to damage the delicate margins of the pressings. The sprues were removed with a disc and the pressings carefully trimmed with a green stone and fitted to the dies (Fig. 10d). Using ceramic stains (Fig. 11) the pressings were stained and fix fired on a platinum foil in a porcelain furnace at 840°C (Fig. 12a). Small additions such as contacts can be made using compatible porcelain (HeraCeram – Heraeus Kulzer) (Fig. 12b). Glaze was applied in thin layers and fired in a porcelain furnace. Two or three glaze layers are applied to ensure that the stain layer is buried and a high lustre obtained (Figs. 12c – f).

Completion

The discrepancies in the mandibular arch were corrected with minimally invasive pressed ceramic onlays (Figs. 13a & b). All the completed restorations were checked for function on the articulated casts (Figs. 14a – c). On cementation the gingival tissues showed some slight inflammation but this soon settled (Figs. 15a – c). Michelle’s smile is now very much in harmony with her face, be it close up, or from a distance (figs. 16a – b). Two years on (Fig. 16c) and four years on (Fig. 16d), the tissues are healthy and the freshness of her smile sustained.

Conclusion

Aesthetic harmony – that balance between the facial form and a smile – can often be the elusive element in a dental reconstruction: ‘The Wow Factor!’ For Michelle her restored smile achieved this promise and complimented her natural beauty so well. She is delighted with the outcome, as are the minions who fall for her winning smile!

Gus’s Tale

Gus’s Tale

Prepped Beam....ZIRCONA COPINGS

Gus (Fig. 1) is an eminent and highly accomplished city architect with a great sense of style, creativity and aesthetics. He also has a phobia of all things dental. We met a few years ago when he turned up on my doorstep with his partial acrylic upper denture in pieces and asked if it could be repaired? I suggested that he needed to see a dentist but he was adamant that he would not and asked if I would repair it as he had an important meeting to go to. I succumbed, repaired it and he was very grateful and happy.

Six months later he was back with charm and a promise that if I repaired it he would go and see a dentist. The following year he was back with three remaining upper teeth blowing in the breeze and yet again his denture in pieces. This time I stood firm and insisted he let me arrange an appointment with one of my clients. With some persuasion – not least because he was unable to function dentally, with resulting weight loss – he reluctantly acquiesced. An alginate impression taken by the dentist put pay to one of the remaining teeth and the last two soon followed.


Treatment

Stage 1: Preparation and implant placement

An alginate pick up impression was taken of the repaired and extended denture (Fig. 2a). As the maxilla was now completely edentulous, the last three teeth were added to complete the arch. The denture was tidied up as best it could be so as to be used during the initial stages of treatment (Figs. 2b – c).

Seven implants (NobelBiocare – Branemark) were placed (Fig. 3a) and a fixture head impression taken. Healing caps were then screwed on to the fixtures and the denture relined with a soft (conditioning) liner and refitted (Fig. 3b).

Stage 2: Temporisation

The fixture head impression was poured and a resin (Pattern resin LS – GC) framework fabricated on six of the fixtures using temporary cylinders (Figs. 4a – b).

Teeth (Heraeus Premium – Heraeus Kulzer) were set onto the framework for a tooth try – in (Figs. 5a – b). The set up was tried in and the tooth arrangement was customised to Gus’s satisfaction (Fig. 6).

Back on the model, indices (Lab Putty – Coltene Whaledent) were fabricated of the tooth position from the try – in. The indices were used as a guide for the fabrication of the definitive teeth.

The try-in was then processed in autopolymerising resin (Palapress – Heraeus Kulzer) and used as a fixed temporary to replace the denture and to load the fixtures (Figs. 7a – c).

Stage 3: Definitive restoration

Definitive, cast to, gold copings with plastic chimneys were screwed in to the implant replicas on the master cast. A castable resin framework was then constructed to the copings (Pattern Resin LS – GC) (Figs. 8a – b).

Using indices taken of the trial set up, a full contour wax up was poured to the framework (Fig. 8c). A beam framework with individual tooth preparations was fabricated by cutting back the wax up (Fig. 9a). This was sprued (Fig. 9b), invested and cast in a beam gold alloy (BiO Degulor M – Degudent). The cast framework was checked back on the master cast (Fig. 10a) and then tried in the mouth to confirm fit (Fig. 10b).

The metalwork with its tooth preparations was refined (Fig. 11a), sprayed with a photosensitive powder (Fig. 11b) and then digitally scanned (Cerec In EOS – Sirona) (Fig. 11c).

Virtual images (Figs. 12a – c) captured by the scanner were used to design the copings to be milled in Zirconia.

The Zirconia copings were milled (Cerec in Lab – Sirona) (Figs. 13a – e) and sintered overnight (ZYrcomat – Vita) (Figs. 14a – b).

Once trimmed and heat treated, ceramic (VM9 – Vita) was applied to the individual copings (Figs. 15 a – e).

Except where screw holes are located under the crowns the rest of the crowns were definitively cemented to the framework (Panavia – Kurarary Co.) (Fig.16). The removable teeth were then seated and the gingiva waxed up (Fig. 17).

After the access teeth were again removed, a putty mould was made of the gingiva, the wax boiled off, the metal opaqued with a pink, light cured opaque composite (Figs. 18a – c), the mould reseated and the gingiva poured in an autopolymerising resin (Palapress – Heraeus Kulzer) (Figs. 19a – c). Once trimmed and polished it was ready for fitting (Figs. 20a – d).

Stage 4: Fitting the restoration

The temporary restoration was unscrewed and removed and the definitive screwed into place and torque tightened (Figs. 21a – b).  Lastly the remaining crowns were cemented over the screw access holes using a temporary cement to facilitate removal for access at future times (Fig. 22).

Summary

After many years of neglect with resulting periodic tooth loss until only three unsalvageable teeth remained in the maxillary jaw, our city architect was finally restored to full dental health and function with an aesthetic appearance, much to his delight (Figs. 23a and 23b). Health is maintained with the assistance of superfloss and a waterpik. The screw retained structure is periodically removed for more extensive hygiene maintenance.

Steaks are back on the menu and a fuller physique regained.

Nicky’s Tale

Nicky’s Tale

Crowns and Bridges: A tooth and implant supported rehabilitation of the maxillary arch

Nicky presented as a young mother who in spite of regular visits to the dentist, had reached a point where extensive treatment had become necessary to salvage and stabilise her failing upper dentition (Fig 1).

To achieve health and function and for Nicky to fulfil her desire to regain her youthful looks a combination of tooth extractions, root treatments, implants, crowns and bridges, would be required.

Nicky provided photographs of her smile from a time when she felt the aesthetics were at an optimum and an appearance that she was keen to regain (Figs 2a-b).

Fig 3: Healed arch after extensive treatment

Initial Stages

A full intraoral examination was carried out. Impression’s, a face bow and jaw registration were taken to provide mounted study casts which were used to aid case planning and initial temporisation from a suck down template.

Treatment

Treatment included extraction of teeth 12, 13, 23, 24 and 25, root treatment of teeth 14 and 12 with subsequent placement of gold post and cores, preparation of the remaining teeth, temporisation and after a healing period placement of three implants in the regions of teeth 13,23 and 24 (Fig 3).

Aesthetics, Temporisation and Definitive Design

An acrylic framework was fabricated on a solid working cast of the upper prepared arch (Figs 4a-b). A full wax up was applied to the framework against a mounted lower cast on which the lower posteriors were modified in wax in advance of planned future treatment (Figs 5a-h). The framework reinforced wax up was tried in to assess the aesthetics and from which new acrylic temporaries were subsequently fabricated (Figs 6a-c).

Definitive Design

Although the temporaries were made as a splinted arch it was decided for the definitive restorations to split the arch up as much as possible for ease of maintenance.

Tooth 16 was fabricated as a full gold crown. Teeth 15, 14, 21 and 22 were fabricated as individual porcelain fused to metal crowns. Teeth 13 to 11 were fabricated as an implant abutment (13) and tooth supported (11) three unit cemented porcelain fused to metal bridge. Tooth 23 was fabricated as a single implant supported crown, cemented onto a customised gold abutment and made from porcelain fused to metal. Tooth 25 was made as a cantilevered pontic from tooth 24. It was made with a stabilising precision attachment (Slide attachment, Cendres Metaux) into the mesial of tooth 26. Last but not least tooth 26 was fabricated as a single porcelain fused to metal crown with a mesial precision slot to stabilise pontic 25.

Fabrication of Definitive Restorations

Individual master dies (Figs7a-b) and a mounted solid working cast (Figs 8a-b) were used to fabricate the definitive restorations.

Cast onto abutments (Replace Select, Nobel Biocare) were screwed to the cast and waxed up to appropriate designs (Figs 9a-f) and cast in a type 4 gold (Degulor C, Dentsply). The gold crown was waxed to full contour and cast. A coping was waxed to tooth 26 and a precision slot(C&M) set into the mesial wall parallel to the implant abutment of tooth 24 using a surveyor (Figs 10a-c). The coping was cast and the male part of the attachment eased into place (Fig 11).

The coping for tooth 24 and the pontic for tooth 25 were, with the male part of the attachment, waxed up and cast. The remaining copings were cast, opaqued and the porcelain applied (Magic, Heppe DTS) (Figs 12a-g). Subtle surface characterisation brought life and youthfulness to the restorations and as a final touch to soften the appearance the bonding metal was gold plated to harmonise with the gold crown.

Cementation

The implant abutments were screwed and tightened into place. The definitive restorations were then cemented (Fig 13).

Conclusion

Regardless of the complexities involved in treating Nicky back to health and function, the aesthetic outcome (Figs 14a-b) achieved its goals and Nicky delighted in regaining her youthful appearance (Fig15).

Acknowledgements

Full credit to Dr Basil Mizrahi for managing a difficult case back to health and function, at the same tame achieving optimum aesthetics

Carla’s Tale

Carla’s Tale

Bridge 21-26 falling out
Failed reconstruction
Carla praying for her dental knight in shining armour...

Immediate loading of implants and lateral screw-retained definitive restorations

Carla is a very lovely lady who presented with the complaint that her upper left bridge kept falling out every time she tried to speak or open her mouth (fig. 1a). All she wanted was to have it glued back so that it would stay put. The rest of her teeth moved in as she breathed in and splayed out as she breathed out. Although her concern was for the dislodged bridge it made much more sense to take a holistic view on her failing dentition (fig. 1b).

Totally oblivious to the extent of her oral disease and restorative failure, she was insistent that all she needed was some strong glue!

It came as quite a shock and took several visits including an emotional meeting with her daughter and myself to convince her as to the extent of her oral breakdown. We then had to explain how health, function and aesthetics could be restored and what it would involve.

With a look as if to say, ‘Can they save me?’ (Fig. 2), she hesitantly accepted her fate.

The Challenge

Management of failure in the restored dentition is always a challenge. Each case is unique and tests the skills of clinicians and technicians alike. Adherence to well established principles is essential if success is to be achieved. The choice of restorative options is constantly expanding with patients now being offered a diverse selection of both clinical and technical procedures.

Removal of failed bridgework, extraction of unsalvageable teeth, placement of implants into the extraction sites and their immediate loading with a pre-fabricated restoration is one such option.

Diagnosis and planning

Impressions, a face bow and a pre-contact centric relation jaw registration were taken (figs. 3a-b), from which casts were poured and mounted on a semi- adjustable articulator (fig. 4). These were used as a visual aid to assist diagnosis, treatment planning and discussions with Carla. CT scans were taken and the SimPlant computer aided programme used to pre-plan implant placement (fig. 5). Prior to treatment, duplicate study casts were

fabricated and mounted on a semi-adjustable articulator. The over-erupted lower incisors were trimmed down and a guide made to accommodate a more favourable occlusal plane (fig. 6). The upper teeth were then removed from the cast and the residual ridge selectively modified, particularly in the posterior region where down- growth of the maxilla had created a reverse occlusal plane. Stock teeth were then set up to the modified lower cast (fig. 7).

The remaining, cut-down lower teeth were then removed from the lower cast and stock teeth set against the upper set-up (fig. 8). The upper teeth were processed, incorporating a cast framework to provide a rigid structure with space to locate and attach implant retained cylinders (fig. 9). The lower was processed as a conventional acrylic denture.

Implant placement and loading

The upper bridgework was removed and the remaining teeth carefully elevated to conserve as much bone as possible (fig. 10). Implants were placed into six of the extraction sites (fig. 11), five were immediately loaded with the pre- fabricated prosthesis (fig. 12), and the lower teeth trimmed down to occlude using the pre-fabricated jig (fig. 13).

Two weeks later, the lower teeth were extracted (fig. 14a), implants placed (fig. 14b) and immediately loaded with the pre-fabricated prosthesis (fig. 14c).

Clinical preparation for definitive restorations

After one year (three to six months would have been more appropriate, but Carla was so happy with the provisional prostheses that she kept delaying the definitive stage) the interim prostheses were removed, and implant head impressions taken. Casts were fabricated and jaw registration jigs with bite rims were constructed (fig. 15a). These were used to capture the maxillary/mandibular relationship, centre line, smile line, canine position and buccal corridor position (fig. 15b). New face bow and jaw registrations were also taken.

Laboratory procedures for fabrication of definitive prostheses

The working casts were mounted (fig. 16) and appropriate abutments selected (fig. 17).

Trial Set-up

A trial set-up was produced (fig. 18) and tried in. Modifications were made and indices then fabricated.

Framework fabrication

Cast rigid substructures with lateral screw fixations were fabricated with the use of the indexed teeth as a guide to incorporating support and retention (figs. 19a-d).

Try-in

The teeth were waxed to the frameworks (fig. 20). the restoration was then sent to the surgery to be tried in. Once checked in the mouth for form, function and phonetics, and with Carla happy with the aesthetics, they were returned to the laboratory to be processed.

Processing

Abutment analogues were screwed into the frameworks,. Silicone putty base models (fig. 21a) and moulds were then made (fig. 21b). The moulds were separated, the teeth removed and all traces of wax thoroughly boiled off both the teeth and the frameworks. The surfaces of the teeth to be bonded were then air abraded with 90 micron aluminum oxide, placed in the mould and conditioned with monomer.

The frameworks were opaqued (fig. 22) and positioned back in their respective moulds together with the teeth. The moulds were sealed with a further addition of silicone putty. Gingival coloured autopolymerising acrylic resin was poured into the moulds and cured in a hydro flask of warm water at 2 atmospheres of pressure (fig. 23).

The processed prostheses were removed from the moulds, adjusted on the articulated casts (fig. 24a), trimmed, access grooves for superfloss incorporated (fig. 24b) and finally polished.

Transfer Jigs

Transfer jigs (figs. 25a-c) were made from GC Pattern Resin to ensure the correct location of the abutments intraorally prior to screw-retaining the definitive prostheses to them.

Summary

Carla was restored to health and function with immediately loaded implants, supporting screw-retained cast fixed beams, veneered with acrylic stock teeth and gingival coloured autopolymerised acrylic resin (figs. 26a-h).

Perhaps the thought behind her smile (fig. 27) is that she found her knights in shining armour!

Acknowledgements

Carla was treated by Dr Koray Feran, who I would like to thank for allowing me publish his clinical material.